Search This Blog

Showing posts with label Campaign. Show all posts

Thursday, November 4, 2021

Darkest Africa mini-campaign Part 4: Attack the fort!

 The final installment, see Part 1 (details rules), Part 2, and Part 3

I am running behind in posting, finally catching up.  Here is the final installment from the solo campaign I did before I went on vacation last month.

We ended last episode with Lt. Barnaby receiving assistance from the eminent missionary Dr. Bravestone, leading the expedition to the gates of the slaver's fort.


Lt. Baraby's plan of attack is to split his force into 2 groups, one under himself and one under Sgt. Singh.  Using improvised ladders, the askaris will mount the walls and deal with the slavers.

Sgt Singh leads his men from the front, attacking from the river side.  His men manage to get to the wall and prop up the ladder in the dead zone between the firing slits (this is NOT a Vauban style fortress!)  But, two of the Askari are out of the fight in the process plus the redoubtable Sgt. Singh.

Lt. Barnaby's troops also manage to get their ladder set up and start firing directly into the firing slits at the Arabs.

Lt Barnaby and a coupel of Askari make it over the wall.

And they manage to clear out most of the slavers.  But... once again Lt Barnaby is knocked down by a bullet and is out of the fight!
The slaver leader is has been dispatched and both Lt. Barnaby and Sgt Singh are both hor de combat.  The redoubtable askari keep up the attack and in an exciting finale, both sides fail morale on the same draw of the card.  I have them redraw and the remaining slavers scamper off while the Askari hold firm.

The expedition was a success!

Lt. Barnaby is mentioned in dispatches for his sterling work and so is Sgt Singh for his bravery during the attack on the camp.  Lt Barnaby returns to his home in Midsomer county to recuperate from his many, many wounds and is ultimately invalided out of the army on half pay.  At loose ends, he and Sgt Singh partner to form a detective agency specializing in discretely handling cases for wealthy clients as well as HM government.  This leads to a tradition of detecting in the Barnaby family that last until this day (or at least the end of season 22)


Reflection

A very satisfying little solo campaign.  The Snakes and Ladders approach has proven to be a very nice mechanism that provides narrative with very low overhead.

One Hour Skirmish Wargames also worked very well.  I urge you to get a copy, it is very extendable and feels "Open Source" like One Hour Wargames.  The card mechanism adds a lot of tension.  It is very fast play but gives as good a result as more complicated systems and has some subtle mechanisms.  I plan eventually (once I paint the models) to fiddle with a version for the Dark Ages.  More Stabby than Shooty.  


Ok, off to work, I hope you enjoyed this.  Next up, my game with Tom and some newly painted figures.

Friday, October 15, 2021

Darkest Africa mini-campaign Part 2: Anzique Ambush! Twice!

 See previous post for Part 1...


Lt. Barnaby's column was now entering the territory of the fierce Anzique cannibals, allies of the slavers. They would love a chance to plunder (and maybe munch on) the column's bearers.


Left to right, the Anzique Chief, an elite White Shield warrior, and a normal tribesman.


The column moves along the trail, unaware that they are about to be ambushed.

This initial Anzique attack falters, as a warrior rushes the rear of the column, but his mates are not as eager. Game mechanic-wise, what happened is the Anzique's pulled a card for their activation points, and when engaging in melee drew a Joker, which immediately stops the turn. I think this makes for a great narrative, as the the unfortunate warrior will be mobbed and bayonetted while his mates hide in the undergrowth.

Later in the game, Lt. Barnaby and an Askari are charged by the chief and the white shields.

Another example of the game play, the chief gets 2 cards for being the charger and an additional one for being a Brute, yet Lt. Barnaby draws well and wins the melee.  Unloaded his revolver at close range?

Eventually, though, the column was cut up by the warriors who gleefully looted the supplies after the porters fled.  A wounded Lt. Barnaby orders the column to fall back.

More porters are recruited and the column treks on...
...until a flooded river crossing forces them to take another oute, still in Anzique territory.


The column is yet again attacked by the Anzique and yet again are forced to abandon supplies, barely getting away.

The column once again regroups and continues its journey. 


A new river crossing is found and the party makes it across.  Camp is pitched, but the undergrowth is alive with noise.  Suddenly it gets quiet... too quiet.


Ok, no more updates for a week plus as we cruise and I start my new job.  I have the rest of the mini-campaign in the can, so stay tuned!

Tuesday, March 16, 2021

Punitive Expedition, Campaign Turns 1 - 4

 See the previous post for slight correction to my Snakes and Ladders map...


Over the last week or so I have managed to slowly make progress on my Punitive Expedition solo snakes and ladders campaign.  here are the first few campaign turns and the first battle.  So far I love this mechanism, it is fast and easy and I like the excitement of the die roll.

Special thanks to Bob Cordery for a mention. Now on to the show.


Campaign turn 1 saw a roll of a six and excellent progress made.  I was fortunate enough to have some good weather and the column made good progress


Campaign Turn 2 saw ANOTHEr 6 rolled which led me directly to an ambush...


By terrible Anzique cannibals allied with the slavers.


I fought the battle using The Men Who Would Be Kings, with the smaller Skirmish Kings option.  It was my first outing with the rules.  It gave a quick game, close order volleys are devastating as they should be.  I managed to get a few pins on the tribal warriors and then cut them down.  The tribal musketeers were useless, as expected. Still getting used to the rules, I look forward to the next outing.  Here is a summary:


As I won, I slide forward (this is the arrow I left out of my original version but fixed)


Campaign roll 3 was uneventful


And campaign roll 4 sees my camp attacked!  we'll save that for next time.  Until then, good gaming!


Tuesday, January 22, 2019

Tank on Tank: Central Front, Play test 2


First an admin note, I have added a section on the left of the current book I am reading.  Not that I think I am an academic, but I have found some great recommendations from other historical gamers and someone may find this useful.  My current book is only $0.99 for Kindle, so how can you go wrong!

Ok, on with the show.

Motor Rifle Regiment Hasty Attack

After the decisive defeat of the Forward detachment and lead Motor Rifle Battalion earlier in the day, the brigade has completed deploying to it assigned positions.  The Brigade commander has pulled C/3-44 Armor and cross attached it to 2/93 INF.  3-44 AR has been assigned C/2-93 INF (Mech) mounted in M-113's and deployed them as battalion reserve.

3-44 AR does not have priority for fires or air support as another sector is under greater threat, so in the next round, it will have to depend on its organic weapons.

Meanwhile, the Soviet Motor Rifle Regiment commander gathers the survivors of the initial probe (which is a single BMP Company) and calls up his other two Motor Rifle Battalions to assault the now identified NATO defensive position.

(In the previous game, NATO units started hidden, but as all 3 tank companies were scouted and fired during the last game and have not repositioned, they will NOT start this game as hidden)

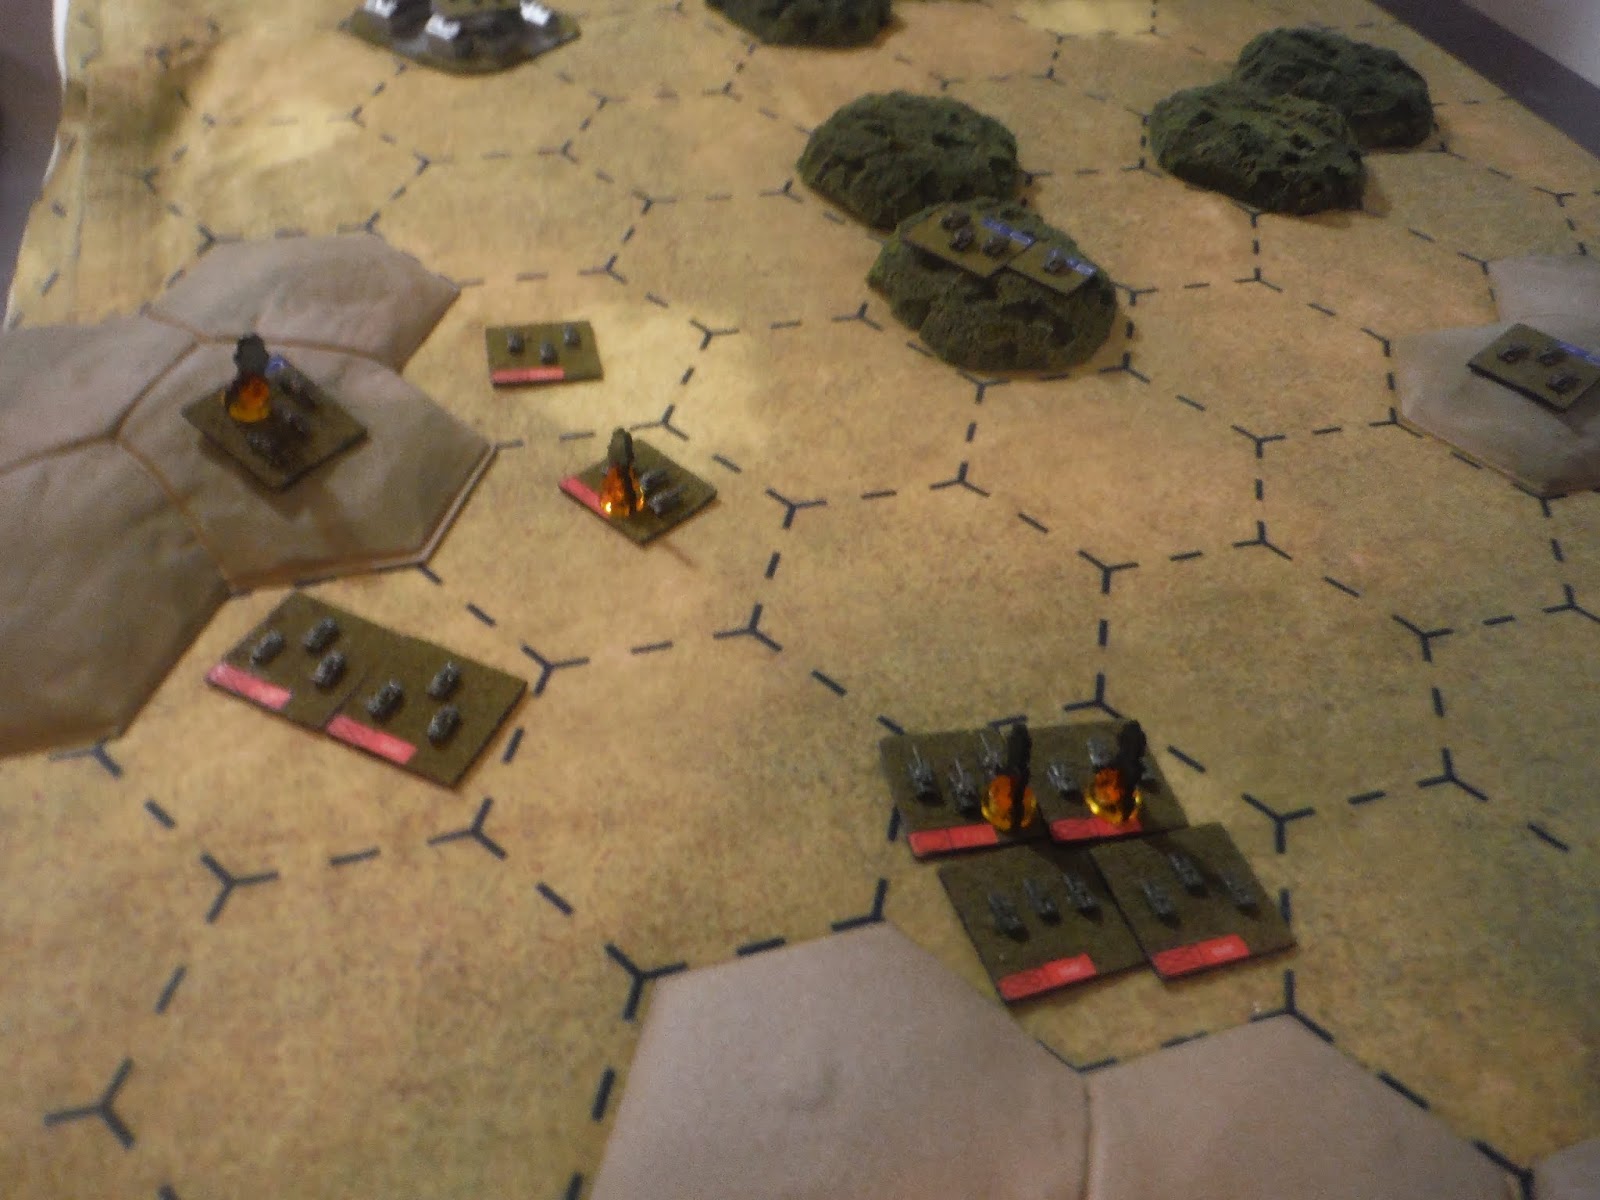
Here is the initial deployment. I did change up the terrain a bit, so the Soviets were not as exposed in their initial assault.  The Soviet plan is to left hook with the two MRB's straight down the corridor to the town while the A/T company and the BMP company left over from the forward detachment protect the flank from A and D company.

 Right out of the gate, the Soviets mass fire on B company, whose positions had been scouted in the previous game, and render the company combat ineffective.


9A few turns later) 3-44 AR has redeployed A company to cover the gap with the scouts, and long-range fire has started to take its toll on the advancing MRB's.

 A BMP company has made it all the way to the town, but is repulsed by C/2-93 INF.  The AT Company and BMP company in support have moved to flank D company to shift them from their position.
 D company has fallen back to avoid being flanked and close assaulted by the infantry.  The Soviets knock out the battalion scout platoon (which had been hindering mobility, they do no damage but reduce movement top 1 hex for enemy units within range.  This may have been too much of an effect and I might revisit, see the rules link in the last battle post)

They also close with to assault A company
 A company also falls back to avoid being close assaulted in terrain.  The MRR continues to take casualties.

 D company finally succumbs to repeated ATGM attack and is combat ineffective at least for the time being.
The MRR attack is finally stopped.  the battalion mechanics and the Brigade's Forward Support battalion will have their work cut out for them, though.  I will use some sort of random mechanic to see which units are ready for the next fight, as combat ineffective does not necessarily equal destroyed.

I still think the rules are working well, next game I will add more artillery and air support and air defense units to exercise those parts of the rules.

All comments are welsome!

Friday, January 18, 2019

Tank on Tank: Central Front (Rules and test game)


Tank on Tank: Central Front

This is a brief introduction to my modifications to Lock ‘n Load Publishing’s outstanding Tank On Tank series for 1980’s Central Front on the tabletop. Despite the rules being free, you should pick up a copy of one of the original games and help support a great company.  I have East Front and it is going to see a lot of use on my table!

This project was not original to me and was completely inspired by these guys, check out their projects and thoughts!


Assumptions (in no particular order)

  • Each unit is a company sized formation
  • Attachments and recon units are platoon-sized units that add special capabilities such as air defense or engineering 
  • Each hex is roughly 1 km across
  • 4 units can fit in a hex
  • Concentrating units makes control easier but makes them vulnerable to artillery and air strikes
  • ATGM's have a slower rate of fire than tank guns
  • Destroyed units are not physically destroyed but combat ineffective for the rest of this fight
  • Helicopters and aircraft represent flights
  • Scouts and recon units should be used to screen friendly defensive positions, locate enemy positions when on the attack, destroy enemy screens, screen flanks, and perform other economy-of-force missions
  • Helicopters are always at a tactically appropriate altitude

To try them out, I have resurrected my 5Core Brigade Commander solo campaign from 3 years ago.
Here is what that game looked like then...


As I am just testing the rules, I have trimmed out the helicopters and electronic warfare assets.  Let’s see how it plays.


CENTAG, August 1985: Campaign Game 1

I will be following the fictional 2nd Brigade, 6th Armored Division.  The division forms part of the US V Corps, and is in the process of completing the implementation of the Division '86 reorganization. All subordinate units have reorganized to the new H series MTOE, but only 2 of the 4 infantry battalions have upgraded from M-113 to M-2 Bradley's.

The Warsaw Pact has launched a short notice assault across the Inter-German border, after a few weeks of escalating tensions for the stated purpose of liberating the FRG from fascism.  The Soviets have announced that they will not use chemical or nuclear weapons and they intend to stop at the Rhine River.

At the outbreak of hostilities, the division's front is covered by elements of the Corps Armored Cavalry Regiment.

2nd Brigade consists of:
  • 1/44 Armor
  • 3/44 Armor
  • 2/93 Infantry (Mech)
  • 1/198 Artillery (direct support from DIVARTY)
2/93 is equipped with M-113, the two armor battalions with M-1's (105mm)

As the Brigade scrambles to roll out of their motor pools, the ACR if engaging lead elements of the 205th Motor Rifle Division...

Game 1: Screening Mission


3/44 Armor has been given the mission to rush to meet the Soviet spearhead and act as a screening force to give time for the rest of the Brigade to form up.  They are to perform a mobile defense / delay in sector.  They have 1/198 FA firing in direct support.


The lead elements of the 205th Motor Rifle Division have rushed passed the Armored Cavalry units on the border and are moving towards 3/44 Armor's position.  Their orders are to identify the enemy position, and bypass resistance encountered.  If they are unable to bypass, they will hold in place and wait for the rest of the lead Motor Rifle Regiment to arrive and perform a regimental attack.

The Soviet forces consist of the Division Forward Detachment (at top of photo) consisting of the Division recon battalion, 1 tank company, and 1 Motor Rifle Company (BMP). Immediately behind is the lead battalion of the Motor Rifle Regiment.  They are reinforced by the Regimental Artillery Group of 122mm guns in direct support. 


Here is the initial setup, with 3/44 Armor in defensive positions screening about an 8km frontage with the Forward detachment probing forward.

Here is the Motor Rifle Battalion (BMP) + that will be following the forward detachment.
The Soviet recon elements scout the NATO forward positions, while excellent gunnery knocks out the lead T-72 company.
The Soviet scouts do their job and pinpoint the NATO forward positions.
The Motor Rifle Company of the forward detachment is eliminated, while the 155mm guns in direct support of 3/44 Armor attrite the follow on MRB.
And here we have the conclusion, with the Forward Detachment and the lead MRB in smoldering ruins.

A few quick observations:
1) I LOVED the way the rules played.  So far so good, but no major changes yet.  That may change 
2) My terrain setup was poor.  It was basically a gunnery range for the tankers of 3/44 Armor.  4-5km visibility, which is very uncommon in West Germany, and the advancing Soviets had no cover or concealment, something they would take maximum advantage of in real life.  So, next game, I will give them a better terrain setup.

Until next time, good gaming!

Sunday, December 3, 2017

AWI Campaign Game 1

Image result for tarleton attacked by dragoon


Apologies for taking a while to start fighting the campaign, but besides Thanksgiving, we also welcomed our first grandchild into the word! She is healthy and happy and I am of course planning to introduce her to gaming, although this week is probably a little early. Mom and Dad are doing fine and my wife spent the night to give them a night's sleep.Now on to the show...

My lovely and talented wife has pitched in to help with the campaign, and she divided the Patriot forces while I divided the British / Loyalists.

The first battle was between the detachments both armies sent west to the backcountry, the Order of Battle was:


Patriots


3 Leaders
Lee’s Legion Dragoons
Lee’s Legion light Infantry (Skirmishers)
1st VA Continentals
2nd VA Continental’s
1 x Artillery
5 militia
1 Riflemen


British / Loyalist


3 Leaders
2 x British Legion Dragoons
2 x Combined Light Infantry (Aggressive Elite, Skirmishers)
British Legion Infantry
7th Foot
Jaegers (Elite, Skirmishers, Rifles)

We used the latest incarnation of my OHW House rules found here.


The Battle

I randomly selected a map from Neil Thomas's One Hour Wargames scenarios and rolled up a river crossing.  For narrative purposes, Morgan's plan is not to fight with a river at his back, but to wait on the other side and defeat Tarleton in detail as they crossed.

Here Morgan ponders his / her plans. 

 As Tarleton, my plan was based on shock action, I would personally lead my Dragoons across the bridge and disperse the militia, leaving room for the rest of my troops to cross and deploy.
I managed to steamroller one militia unit, but the beautiful General Morgan reoriented her forces to contain me and I did not have enough space to bring more troops across.

 Here we have the Rebels pouring fire into the brave British Legion dragoons while the British Legion foot prepares to cross and support them.  The lights fire across the river sporadically.


Here we have the climax of the battle.  The Dragoons and Legion infantry that crossed the river are annihilated by concentrated Rebel fire.  Tarleton killed (unknown whether during or after the battle...)  

With reports that Tarleton was hor de combat, Major Newmarsh of the 7th foot takes command and calls off the attack.  The British fall back and prepare to regroup with Cornwallis' main army.

After Action Review

My Take on Events:

From a campaign standpoint, the British have permanently lost half of the British Legion Dragoons and all of the British Legion foot, as well as Tarleton himself.  On the other hand, it was not nearly the disaster of the actual Battle of Cowpens, where Tarleton lost his entire command.

From a rules standpoint, we have not played these in a while and it took a little while for both of us to get back up to speed.  The next game between the main armies will be an open field battle and should be interesting, with more room to maneuver. 

Jozi's Take on Events:

As a relative newbie to the wargaming life, I will have to say that I was a bit frustrated with the whole bridge thing. Not only did the bridge limit strategy, but the troop abilities also limited setup choice.Take, for instance, I had 5 units of really lousy militia with a firing capability of two base widths. Great range, but the troop's firepower was limited by 1/2 when compared to everything else on the table. So, I ended up seeing the militia as war fodder as I immediately lost two entire units to the British Calvary. 

Being a very big poor sport, I got pissy and pulled back all of the "good troops" in my mental attempt to start over again (British set me up). This big baby move actually proved to be a good idea. 

Having cleared the field a bit, I then moved everything that I felt was "fodder" in direct line with that darn bridge. This included the cannon, which I quickly fell in love with. After a few lucky rolls and some aggressive rallying of the troops (to clear up some hits), the British began a running! 

Working with newbies or your wife, keep in mind a few things:
Tip #1 Always be clear when asked a question. When asked if my riflemen were safer in the treeline or pulled back, the British cunningly said "Oh yeah! They are untouchable in the treeline." Not true, if you roll a 6. 
Tip#2 Never set up newbies, or your wife's, men. No need to say more on this.
Tip#3 Keep scenarios simple.
Tip#4 Run through some open field practice games. 
Tip#5 Keep the newbie focused on using the quick reference sheet. That way the seasoned gamer is a bit less responsible for all the other person's bad die rolls and strategy errors.

Tuesday, October 21, 2014

5 Parsecs from Home Campaign

Like many of us, I spend far too much time making terrain, painting figures I may never use, and reading rule-sets rather than actually playing.  So, I decided I want to play a 5 Parsecs from Home campaign and see how the rules work.

So let’s start with our cast…  (click to enlarge)


First Job
For my first game, I wanted to dive right in, so I assumed the platoon secured a patron for a job.   Using the Five Parsecs from Home book, I generated the following mission:
  • Patron: Wandering Preacher
  • Mission: Find Someone (Who?: Technician)
  • Enemies: Zealots
  • Mission Type: Strike
  • Opposition will have player figures 1 less figure than the player.
  • No stealth, daytime

This was quick ad easy using the tables in the book.  Now to turn this data into a narrative and play the game!

A wandering preacher from the Reformed Church of COBOL has hired a technician to translate some of the early church documents from an old mainframe.  Zealots from the Fundamentalist Church of COBOL have kidnapped the technician to prevent this from happening.  The platoon's mission is to locate and free the technician in the abandoned industrial district at the edge of town.

Here are the results are some random shots of the game, used a different camera than I usually do, so they turned out not a good. Buildings mostly by Finger and Toe models.

 "So, padre, what can I do for you?"
Initial setup for the zealots 

 Riley's Renegades moving into the area of operations
 After several turns of exchanging fire and maneuvering
One of the platoon members down

Fortunately, Riley managed to kill the only zealot guarding the technician inside the warehouse, and they ran the rest off. 

Post mission wrapup:

  • Results: 2 Enemy OOA, 2 Bailed off the table, technician retrieved, mission success.
    • 1 private rendered OOA, needs 2 campaign turns to recover.
  • Acquired new enemy: Zealots from the Church of COBOL
  • Loot: Gadgets, roll twice on Found Gear table and get…
  • Scanbot: This will be useful for defense scenarios, although it is unarmed.  It will help during stealth missions.
  • Assault Attachment: Allows figures to receive a +1 chaging bonus even when not charging.  Going to keep this for my officer…
  • Trade Items roll:  Local Map: This is a onetime use item that allows a free scurry move at the beginning of a scenario.

Overall Impressions:
This is not a full review, but just some of my random thoughts.  

The rules played very, very smoothly.  I have been playing Two Hour Wargames rules for many, many years, all the way back to Chain Reaction version 1, and I am a firm believer in skirmish rules that make it risky to prance about in front of unsuppressed enemies with automatic weapons.  5 Core does this well and in a very fluid manner.  Chain Reaction sometimes gets in to multiple cycles of “shoot/received fire test/shoot back/received fire test…” while 5 Core handles this with one set of die rolls. (note: I have not tried Chain Reaction Final Version 3.1 yet)

An example of firing in 5 Core is an active figure with an assault rifle shoots with 1 kill die and 1 shock die.  I pull a red d6 for the kill die and a yellow d6 for the shock die and roll them at the same time, so if I miss, there is no extra step to see if the target ducks back or scuttles off.

Reactive fire is (almost) always suppressive and usually just uses shock dice.  Cover helps by making you less likely to run away when shot at thus more likely to be in place to return fire on your turn.
The flow of the battle felt right, with guys trying to suppress enemies while others rushed forward and fields of fire were critical.  Stationary defenders were able to drive off the attacker until the attacker could achieve fire superiority.  All very good stuff with elegant mechanics.

I was a little skeptical of the lack of quality stats for each figure, but the use of skills does seem to offset this.  My officer was “inspiring” which allowed him to convert “bail” results to “flinch,” making it easier to keep guys up and shooting, which the NCO was “tough,” which allowed him to shake off his first hit.

My final thoughts:
I like the single die roll for both damaging and suppressive fire.  Much less die rolling than other rules.
The Scurry and Firefight actions that can occur during a turn add a nice element of uncertainty that should be present in a short range firefight.
The rules are simple enough that I can use them with non-wargamers.
The campaign rules are great and really add flavor to the game.

I will continue my campaign and will be playing these rules more!  

The price is also right and 5 Core and the Sci-Fi supplement 5 Parsecs from Home are both available from Wargames Vault here.