Search This Blog

Sunday, January 26, 2020

Soviet Tank Corps is done!

I have finally finished all of the support troops for my Soviet Tank Corps.  Here it is in all of its glory.
Don't forget I have actually painted TWICE this amount for the double-blind game, one for the Soviet players and an identical set for the German table as units are spotted.  Overkill?  Probably, but that's how I roll...

Here is the Tank Corps with the subunits delineated, click to enlarge.  I am planning for 3 players for the Soviets, one for each Brigade with the Corps assets divided between them or run by a 4th player playing the Corps commander.

The Corps consists of:

  • 2 x Tank Brigades consisting of
    • 4 x units of T-34's
    • 2 units of SMG Tank Riders
  • I Motor Rifle Brigade consisting of
    • 6 x units of Motor Rifle Infantry
    • 1 unit of 45mm Anti-Tank Guns
  • Motorcycle battalion consisting of 2 x Lighta nd 2 x heavy recon elements
  • Corps attachments
    • 1 x SU-76 Assault Gun Regiment
    • 1 x SU-85 Anti-Tank Regiment
    • 1 x SU-152 Assault Gun Regiment
  • Attached Artillery (from Army Level)
    • 2 x 76mm Battalions
    • 3 x Howitzer Battalions
    • 2 x Rocket Battalions
  • Logistics units: Trucks to use as counters in the rules
I figure each player will have 6-8 units, which should make them a little more conservative.

Right now, as we speak, I am printing out markers to indicate units that are firing (so when I umpire, I can keep up with that and remove the markers from units that have resolved their fire) and motorized movement markers to indicate motorized infantry units that are not moving tactically.

The rules themselves are still percolating, I will not start playtesting the mechanics until I have both forces painted up.

Next in the painting queue are the two Panzer Grenadier Regiments for the Panzer division.  Stay Tuned!

Here is my Kanban Board progress:


Saturday, January 25, 2020

How I paint irregulars and militia

Never fear, my new found addiction to 3d printing has not stopped all progress on my 3mm Eastern Front, Double-Blind game project. 

I have the support troops for the Soviet Tank Corps done and almost finished basing, they are not quite camera ready. It includes the motorcycle battalion, artillery in 76mm, 122mm, and Katyusha flavors, and attached assault gun and anti-tank regiments including SU-76, SU-85, and SU-152.  Additionally, I have 3d printed some custom markers to help me keep up with firing units and motorized movement.

I do have to admit that Kaptain Kobold's WW1 games are tempting me to get my Trench Hammer stuff out again.  I think after I get the Soviets, I will take an intermission, finish painting and prepping my 3d printed trenches I have scaled for my 10mm troops and get a couple fo games in, to clean my palette, then on to start painting the Panzer Division in 3mm.

Meanwhile, I wanted to get something posted, so here is a short entry.

Painting regular troops, at any scale, is much easier to do in assembly-line fashion than irregulars or militia.  One of my half-completed projects is my 6mm AWI Skirmish troops for Rebels and Patriots or Sharp Practice 2.  This requires a LOT of militia and I find that I have "analysis paralysis" when trying to decide how to paint them.

So... I have developed a method to make it easier.  I had thought it was an amazing, original idea, but I have seen a lot of variations on this.  What I do is this:

  1. Identify what you are going to paint for your batch of figures, pants, shirts, etc.  I paint my 6mm in batches of 16 (4 x Baccus strips) glued to a piece fo wood.
  2. Pick a set of colors, 6 works best.
  3. Put a sample of each color on an index card and assign it a number from 1-6
  4. Get your paint ready by lining up the bottles or preparing your palette.
  5. Roll 16 x d6 and line them up in a row
  6. run through the dice left to right and paint the figures left to right with the color indicated by the die.
  7. I mix up the dice sometimes if I have 3 or 4 of the same color in a row, but otherwise, I ruthless force myself to use the color indicated and not think about it too much (so I don't slow down)
  8. When done, I repeat the same process for the next article of clothing.
I use a similar process for painting horses and it really helps me just get on with it.

Here is a sample of my randomizer cards, you can see how I set the frequency of the horse colors, and I actually use a d10 for the coats/shirts, giving a lot of variety, without having to think about it.

I hope this is helpful.

Now I am going heads down to work on grad school, but until next time, good gaming!


Monday, January 20, 2020

SOLD (Almost) Free 3mm Vehicles and Infantry

These are no longer available


Continuing my Winter Cleaning, and I have gobs of 3mm taking up valuable drawer space that I need to get rid of. This is a great opportunity to try out 3mm if you have been considering it or expand your current holdings!

I have NOT lost my love of 3mm, but these are mostly leftovers from other projects that I just need to clear out.  I am still diligently working on my 3mm East Front project.

They are all Pico Armor and consist of:

  • Tons of Sci-Fi that I picked up in a trade, culled out what I wanted, but there are still tons of vehicles and infantry.
  • Leftovers from my Cold War Project and my Stryker Brigade Combat Team Project
  • Leftovers from my Interwar Imaginations project.
  • My Korean War Project
    • Nothing wrong with these, I just decided to go another direction.  Some are painted and based, I threw in a lot of 40mm x 20mm oval bases.  CVF are represented by Japanese, which works at this scale
  • Plus various buildings, earthen bunkers, barbed wire, etc.
This is a grab bag,  buy it, keep what you want and pass it on!

Only $15 for CONUS Via Pay Pal, just to cover shipping via USPS priority mail, if you are overseas, just contact me and we will see how much it will cost.

Thanks!


SOLD Trenches for sale, Flames of War sized

THESE HAVE SOLD


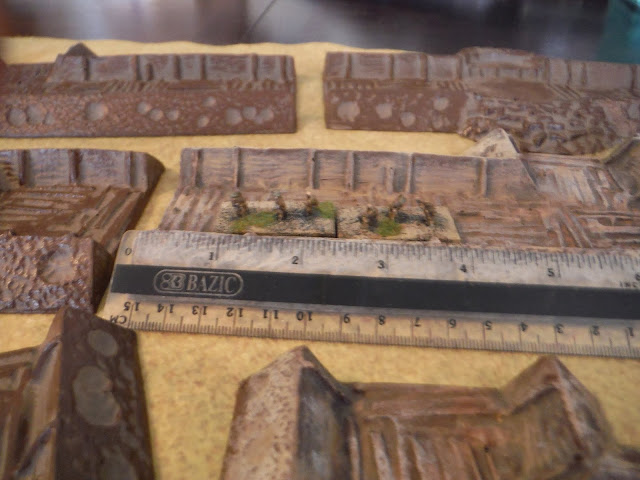
I originally bought these for my 10mm WW1 project and used them for a couple of years, but the footprint is better suited to 15mm and I am 3D printing my own to fit my 10mm figures and the bases I use.

Here is a description from when I first bought them: http://jozistinman.blogspot.com/2018/03/3d-corp-flexible-craters-and-trenches.html

They seem to be the same size and scale as the Flames of War trenches and are very durable.  Notes, I am keeping the craters, so you will get what is in the pictures below. The long sections are 8" long and the interior is 40mm wide.

You can also see them in action here: http://jozistinman.blogspot.com/search/label/WW1

I just need to get them out of the house and sent to a good home, so I would like $20 plus $10 shipping via USPS Priority mail for CONUS, anyone overseas we'll calculate the shipping cost.  Pay Pal only, please.

You can email me, PM me on The Miniatures Page ( Jozis Tin Man), or leave a comment here (I won't publish it)


Thanks!


Saturday, January 18, 2020

Adventures in 3D Printing

So... my amazing and lovely wife got me a 3D Printer for Christmas. Wackiness ensues.

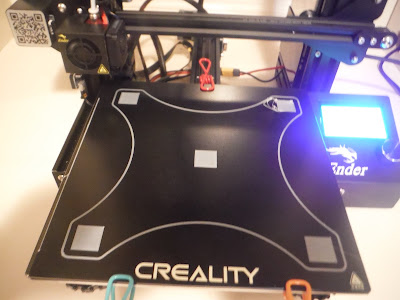
I won't give a complete blow by blow or how-to, but here is how I have spent my limited free time over the last few weeks.  We got a Creality Ender 3 Pro, after some shopping around, but mostly because that is what John has and it seemed highly recommended by Fat Dragon Games.

It was very affordable, just a smidge over $200, and I went ahead and got the glass print bed for $12 more.  For those of you not familiar with 3D printing, see the Fat Dragon Link above.  I have to say that I LOVE IT!  This is not a plug-and-play experience, it is a kit and requires some basic mechanical skills to assemble, but no soldering, etc.  It should not be beyond the skills of anyone who paints miniatures. 

And I love it because it reminds me of my childhood, sitting in a cold garage in 1981 with my dad getting our TRS-80 Color Computer upgraded from 16k to 64k of memory.  Yes, that is kilobytes) Unless you are willing to plunk down ~$2000, it is still a hobby with a DIY component, which is just fine by me. 

It took me about 3 days to finish putting it together, fiddling with it a little at a time in the evenings, and I methodically followed the advice here, in fact I did not even refer to the instructions:


When I was done, I had this!

The hardest part was manually leveling the bed.  It was not too difficult, but I took my time.  It is like gapping a sparkplug but with the hot end fo the printer and a piece of paper. Unfortunately, I was terrible at gapping spark plugs and here is the result fo my first print.
I managed to put the magnetic print bed on upside down and the print head was to low.  It just dug a nice hole into the print bed.  Fortunately, the printer came with 2 print heads, and I had the glass bed I had purchased and not installed yet.

The next Print failed because the Bowden tube that feeds the plastic to the hot extruder was not seated all the way.  I found and fixed that.

I was finally able to get a test pattern printed out, but one corner was too high as you can see.
Some more fiddling and I finally got a good test print.


I fired up one of the test prints and it shifted midway through...
I think the cause was some of the cables on the back catching, but I managed to finally print one wargame worth item, a 1/150 scale M26 Pershing that will eventually be used in my 10mm Korea project.

Hard to tell from this picture, but the detail is pretty good, I may give it a quick paint job soon so you can see it better.  Since taking these pictures I have kept it running every night and have printed 3 more Pershings, accessories for the printer like drag chains for the cables, a filament guide, and a tool holder. 

You can expect to see quite a bit more on the blog, as I have been prototyping a trench system for my 10mm WW1 troops, printing tanks in various scales, and creating useful markers for games.  I need to get back to my 3mm East Front project, but I can see this being an enjoyable adjunct to the hobby.

I am done with the last Soviets and am basing them, so stay tuned.   Good gaming!